How to Patch Up Your Stucco Walls
What you’ll learn about stucco patching in this guide:
- Common Stucco Problems in Edmonton AB
- Necessary Tools and Materials Required to Address Stucco Problems
- Our Stucco Patching Process
- Maintenance Tips for Your Stucco
For more information, call us at (780) 710-3972.
Common Stucco Problems in Edmonton AB
Stucco can develop several common problems, such as cracks, discoloration, and mold growth. These issues affect the appearance of your home and can lead to severe structural damage if not addressed.
Cracks are the most noticeable problem. They can result from the natural settling of the house, weather fluctuations, or even seismic activity. Small cracks might seem harmless, but they can expand over time and allow moisture to seep in, leading to more significant damage.
Discoloration is another frequent issue with stucco. It can be caused by various factors, including water intrusion, mold, or even the natural aging of the material. When stucco discolors, it’s not just an aesthetic problem; it may indicate underlying moisture issues that must be addressed promptly.
Mold growth on stucco surfaces is a serious concern, especially in humid climates. If the porous structure of stucco remains damp for extended periods, mold can thrive. Mold compromises the structural integrity of the stucco and poses health risks to the home’s occupants.
Addressing these common problems promptly is essential to maintaining the durability and beauty of our stucco exteriors.

Necessary Tools and Materials Required to Address Stucco Problems
We need the right tools and materials to address cracks, discoloration, and mold growth.
Let’s start with the basics: a sturdy ladder ensures we can safely reach high areas. To clean the damaged spot, we’ll need a stiff brush and a pressure washer. Protective gear like safety goggles and gloves protects us from debris and chemicals.
Next, we need a chisel and a hammer to remove loose stucco. A wire brush will help clear out any remaining debris. We also need a mixing drill and paddle to mix the stucco patch. A pre-mixed stucco patch compound is ideal, but you can mix your own using Portland cement, sand, and water.
A hawk and trowel are indispensable for application. They help spread the patch evenly. We’ll also need a float to smooth out the surface and match the texture of the existing stucco.
Our Stucco Patching Process
Step 1: Preparing the Area
Before we begin the repair, we remove any loose debris and dirt from the damaged area.
We gently scrub the area using a wire brush to remove crumbling stucco and dust. We remove all loose material to ensure the patch will adhere properly. If we find any stubborn debris, a putty knife can help scrape it away.
Next, we inspect the exposed lath and the metal netting behind the stucco.
If it’s rusty or damaged, we’ll replace that section to provide a solid foundation for the patch. We cut out the damaged lath using tin snips and secure a new piece in place with galvanized nails.
Once the surface is clean and the lath is secure, we dampen the area slightly with water mist.
This step prevents the stucco from drying out too quickly. A spray bottle works well for this. Be careful not to oversaturate the area; we want it damp, not dripping wet.
Step 2: Mixing the Stucco
With the area prepped and ready, we gather materials and mix the stucco to the right consistency. We’ll need a bag of stucco mix, clean water, a mixing bucket, and a sturdy mixing tool. We follow the manufacturer’s instructions on the stucco bag for the correct water-to-mix ratio.
First, we pour the dry stucco mix into the bucket. Then, gradually add water while stirring continuously to avoid lumps. We want to achieve a thick, peanut butter-like consistency, which guarantees the mix will adhere well without sagging. If the mixture is too dry, it won’t bond properly; if it’s too wet, it will be difficult to apply and may not set correctly.
We keep mixing until all the powder is fully incorporated and smooth. Take time to confirm there are no dry pockets or clumps. If you’re mixing a large batch, an electric drill with a mixing paddle can make the job easier and faster.
Once the stucco reaches the desired consistency, we’re ready for the next step. Remember to clean your tools promptly to prevent the stucco from hardening. Now, we’re ready to apply the patch.
Step 3: Applying the Patch
Now that the stucco mix is ready, we apply the patch to the prepared surface.
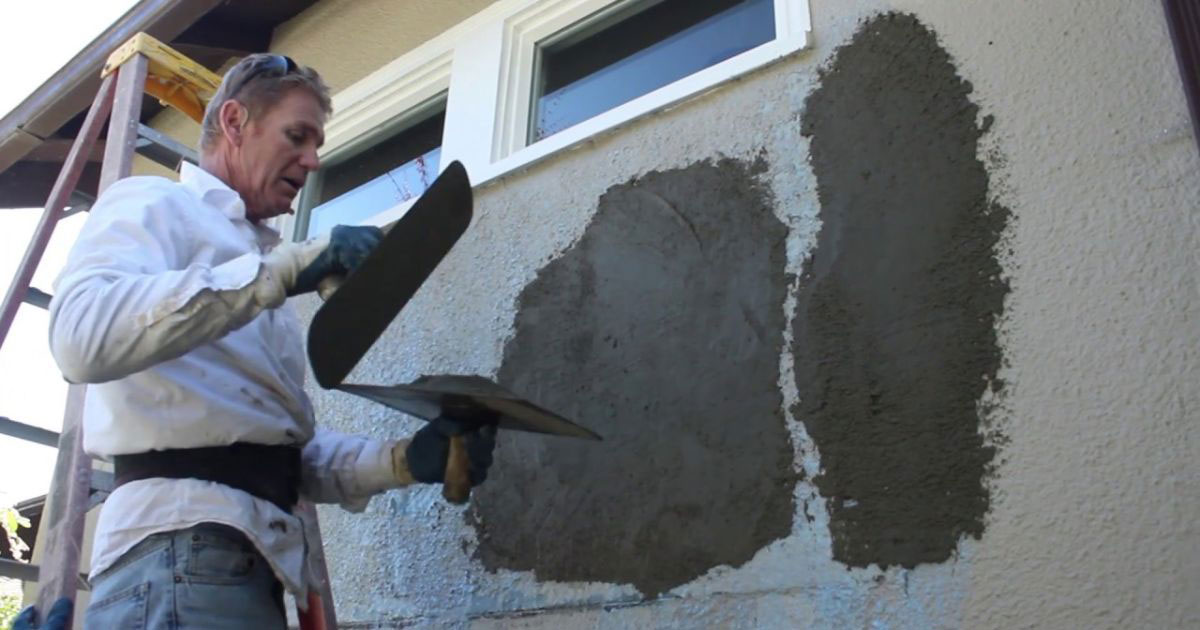
First, we dampen the area with a spray bottle; this helps the stucco adhere better. Holding the hawk in one hand and the trowel in the other, we scoop a generous amount of the mix onto the trowel.
Next, we press the trowel against the damaged area, spreading the stucco mix evenly. We apply firm pressure to guarantee the patch bonds well with the existing stucco. We work the mix into the edges of the damaged area, making sure it fills all the cracks and gaps.
If the patch is thick, we might need to apply it in layers, letting each layer set slightly before adding the next. We continue this process, covering the entire damaged area and guaranteeing the application is uniform.
Throughout, we look for air pockets or voids that might weaken the patch. By carefully applying the stucco mix, we lay the groundwork for a strong, durable repair that blends seamlessly with the surrounding surface.
Step 4: Smoothing the Surface
We’ll need proper tools to smooth the surface before applying the final coat, guaranteeing a seamless finish.
Tools Needed
To achieve a smooth surface when patching stucco, we’ll need a variety of specialized tools designed for ease of use.
A hawk and trowel are essential. The hawk holds the stucco mix while the trowel applies and spreads it evenly. A plasterer’s trowel, with its wide, flat blade, helps us achieve a consistent layer and a smooth finish.
Next, we need a float, preferably a rubber or foam one. It’s perfect for smoothing the stucco and removing any ridges or high spots. A margin trowel is another must-have; its small, pointed blade is excellent for working in tight places and making precise adjustments.
A good-quality putty knife is also vital. It’s versatile and helps apply the patching compound in smaller areas. A drywall knife can be more efficient for larger surfaces.
A sanding sponge or fine-grit sandpaper is useful for lightly sanding the patched area once it’s dry, ensuring a smooth finish.
Applying Final Coat
As we apply the final coat, we focus on achieving a seamless, smooth surface that blends perfectly with the existing stucco.
First, we make sure the patched area is slightly damp. This helps the new stucco adhere better and prevents rapid drying, which can cause cracks. Using a trowel, we’ll apply the final coat in thin, even layers.
It’s essential to feather the edges of the patch into the surrounding stucco. To do this, we’ll hold the trowel at a slight angle and blend the new material into the old. This technique guarantees no visible line where the patch begins and ends. We’ll need to work quickly but carefully, as stucco starts setting in about 15 to 20 minutes.
Once the final coat is applied, we’ll smooth the surface using a float. Circular motions with the float will help achieve a consistent texture. If the existing stucco has a specific pattern, we’ll replicate it at this stage.
After smoothing, we’ll leave the patch to cure for 48 hours, periodically misting it to prevent drying too fast.
Step 5: Curing the Stucco
Now that we’ve smoothed the surface, we focus on curing the stucco properly.
Let’s explore how to control moisture and determine the ideal curing time to guarantee a durable finish.
Moisture Control Techniques
Proper moisture control ensures the stucco cures correctly and remains durable over time. It’s important to manage the moisture levels during the curing process.
The first step is keeping the patched area damp but not too wet. We regularly mist the stucco with water using a spray bottle or hose with a fine mist setting. This prevents the stucco from drying out too quickly, which can cause cracking.
Next, we ensure the surrounding environment supports proper curing. The stucco can dry too fast if it’s too hot or windy. In such cases, we can use damp burlap or plastic sheeting to cover the patch, helping to retain moisture. This creates a more controlled environment for the stucco to cure evenly.
Additionally, we need to consistently monitor the moisture levels. Overwatering can be just as damaging as underwatering. By striking the right balance, we help the stucco achieve the necessary hardness and durability.
Combining these moisture control techniques ensures our stucco patching project will stand the test of time. Proper moisture control is the key to a successful stucco repair.
Optimal Curing Time
Determining the ideal curing time for stucco ensures maximum strength and longevity. Curing isn’t just about drying; it’s a chemical process that confirms the stucco hardens properly.
Typically, stucco needs at least 48 hours to cure to a point where it can withstand light moisture without significant damage. However, for full curing, we should allow at least 28 days. This extended period guarantees that the stucco reaches its full potential regarding durability and resistance to external elements.
During the curing period, we must keep the stucco moist. This can be achieved by misting the surface with water several times a day, especially in hot or dry conditions. This step prevents the stucco from drying too quickly, which can lead to cracking and weakening of the material.
Additionally, avoid exposing the newly applied stucco to freezing temperatures or direct sunlight, as these conditions can adversely affect the curing process.
Step 6: Painting and Finishing
With the stucco patch fully dried, we can move on to painting and achieving a seamless finish.
First, we ensure the patched area is clean and free of dust. A damp cloth usually does the trick. Once clean, we apply a primer designed for masonry or stucco surfaces. This step helps the paint adhere better and guarantees a uniform color.
After the primer is dry, we start painting. We use a durable exterior paint that matches the color of the existing stucco. Using a brush or roller, we apply the paint in even strokes. We might need to apply two coats for the best results, allowing sufficient drying time between each.
Blending the edges of the patched area with the surrounding stucco is key to achieving a seamless finish. Feathering out the paint and using a texture brush can help match the existing texture.

Maintenance Tips for Your Stucco
Once the stucco patch has achieved a seamless finish, it’s important to implement a few maintenance tips to keep it looking great for years to come.
- Regularly inspect your stucco for any signs of cracking or damage. Early detection allows you to address minor issues before they become major problems.
- Clean the stucco surface periodically. A simple mixture of water and mild detergent applied with a soft brush can remove dirt and prevent mold growth. Avoid high-pressure washing, as it can damage the stucco.
- You also need to monitor your home’s drainage system. Proper drainage prevents water from pooling around the foundation, which can lead to stucco deterioration. Ensure gutters and downspouts are clear and direct water away from the house.
- Additionally, pay attention to the vegetation around your stucco. Trim back any plants or trees that are too close, as they can trap moisture against the stucco, leading to damage over time.
We Offer Stucco Patching in Edmonton AB
Depend Exteriors offers reliable stucco patching services in Edmonton, AB, ensuring your exterior walls remain in good condition. Our skilled team specializes in repairing cracks, discoloration, and mold growth, using durable materials and precise techniques to restore the beauty and durability of your stucco.
Whether for residential or commercial properties, we handle all stucco repairs, guaranteeing seamless results that blend perfectly with your existing structure. With over 13 years of experience, Depend Exteriors is your trusted choice for reliable and efficient stucco patching.
Call (780) 710-3972 or schedule a consultation and keep your property looking its best.

